If you’re wondering how to convert a raster image to a clean, crisp, and scalable Victor image, you’re in the right place. In this guide, we will explore how to vectorize an image in Illustrator, covering various techniques and tips to convert an image to Victor with ease. Illustrator is a powerful tool that offers various ways to create Victor images, Whether you’re looking to vectorize artwork, turn a photo into a vector, perform image tracing, or Victorize a logo or text in Illustrator, By the end of this tutorial, you’ll know how to make great vector graphics from your images, step-by-step.
Steps to vectorize an image in illustrator
Follow these steps to vectorize an image in Illustrator or make your drawing, art, or logo. But remember that to get better performance and smoothness while vectorize an image in Illustrator your system has to meet the minimum system requirements.
Let’s start with an Example
Step 1: :Open Illustrator and Import an Image
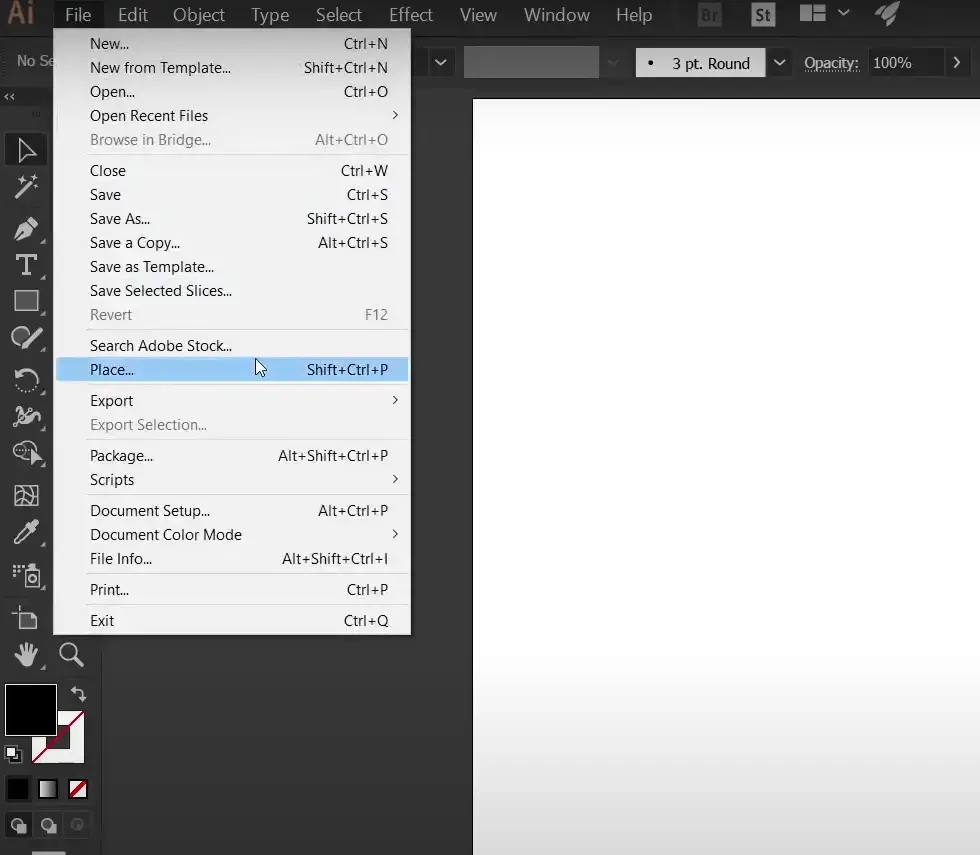
Open Illustrator on your computer and choose any image that may be JPEG, PNG or any other format you can vectorize or scale it, no matter how much you scale, and it will always look perfect, To do this in Illustrator, it is very easy. First, you have to go to File, click on Place (file > Place), and then select the image you want to use.
Step 2: Open Image Trace Vectorization
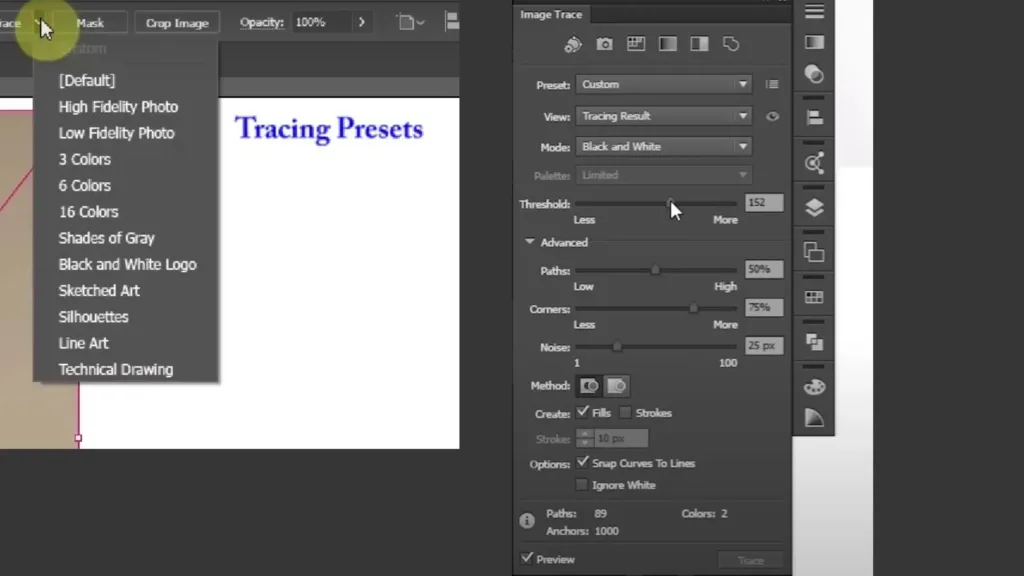
Today we will be using the image trace option to vectorize an image. When you click on image trace option, Illustrator will convert an image black and white as result tracing by default. Lets undo that and click on the arrow next to the image trace You can see the basic tracing presets or you can click on window and select the image trace to open the image trace panel. in short, click on arrow next to image trace redirection down or tab at Window > Image Trace.
Step 3: Specifying Image Tracing options
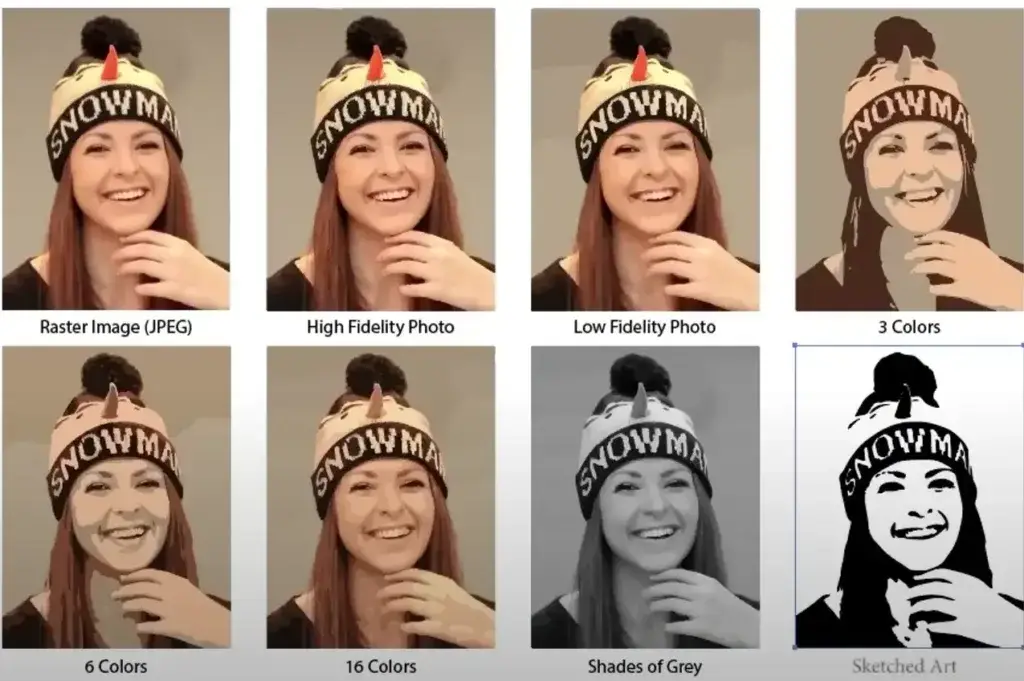
When you open the image trace panel, you can choose the presets that match your image, such as high-fidelity photo, low-fidelity Fidelity Photo, Black and white, etc. Lets have a look all of the available presets on image trace.
1. High-Feedility Image :
That creates an image similar to the original image and is also great for high-quality image when you want to keep alot of details.
2. low-feedility image
It creates a less detailed version of the original image. This preset simplifies the image, reducing the amount of detail and the number of colors. this presets is best for a simple image that does not contain many details or if you want a more abstract look.
3. 3 Colors
It convert an image into victor only in three colors; this is best for images that contain only few colors.
4. 6 Colors
it converts the image into a vector with six colors.It is useful for images with a small range of colors while still retaining some detail.
5. 16 Colors
It converts the image into a vector with sixteen colors.It works well for images with moderate color variation
6. black and white logo
It convert the image into black and white. and this is great for creating the contrast logos or illustrations
7. Sketched Art
this presets is designed to mimic the look of hand-drawn sketches. it convert the raster image into victor image that looks like it was created with pencil or pen.
8. Auto Color
It trace the image using a broad color range, attempting to recreate the original image as closely as possible
Step 4: Adjust the Setting
You can use the advanced tools to fine-tune the image.
1. Threshold:
Threshold helps Illustrator decide which parts of the image are dark or light. This is important for figuring out how much detail and contrast will be in your traced picture
Moving the slider to the right will add more dark areas to your picture, while moving it to the left will make them smaller. A higher setting will catch more details but might make the picture look messy.
2. Paths:
Paths determine how well the traced lines match the original picture. It helps make the traced image look more like the real one.
Turning up the Paths value makes the traced lines match the original image better, so the trace looks more detailed and exact. But it might also make the trace a bit more complicated.
3. Noise:
Noise helps you ignore tiny, unimportant details in the picture. This makes the traced image simpler by leaving out small dots or mistakes.
4. Corners:
Controls how sharply corners are defined in the trace.
5. View Options:
Allows you to see the trace in different modes to better understand the results.
Step 5. Trace the image
Once you’re satisfied with the settings and the preview of the image, click the trace at the bottom of the image trace panel. Illustrator will convert the image into a vector format. It can take a few moments to trace your image; it depends on your image quality.
Step 6: Expand the Trace:
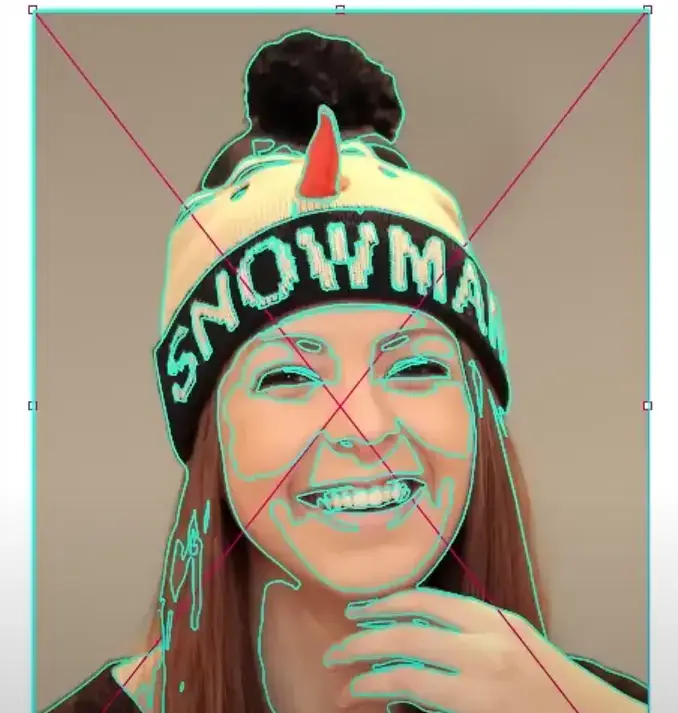
At this stage, Illustrator has traced your image, but it hasn’t yet converted it into a set of vector paths. To do this, just go to (Obejct > Expand), and click OK but make sure that your trace is selected. and you can see the blue different blue lines or paths which make your image victor. If you open the layer panel, you can see each of the individual paths.
Step7: Ungroup the Paths (Ifnecessary)
After you trace an image in Illustrator, it groups the shapes together. Ungrouping separates these shapes, so you can edit each one individually. To ungroup, select the image and go to Object > Ungroup.
Step8: Save and Export Your Vector Image
To keep the image in vector format for future edits, go to File > Save and choose Adobe Illustrator (.ai) format.
If you need the vector image for different applications, go to File > Export. Choose formats such as SVG, EPS, or PDF depending on your needs.
What is vectorization, and why vectorize an image?
Victorization is the process of converting a raster image made of small dots (pixels) into a Victor image made of lines or shapes. The raster image can get blurry when you make it bigger or zoom in, but the Victor image stays sharp and clear at any size. This is great for logos or designs that need to be resized. Adobe Illustrator offers these features to convert the raster image into a vector image.
Victorizing an image has many benefits. The first benefit is that when you vectorize an image in Illustrator, it stays clean and sharp, no matter how big or small you make it. Actually, this works great for designs, drawings, and logos that need to be resized and zoomed in or out according to necessity. Victor images take up less space with their high quality, and you can edit, resize, shape, or change any details without losing their quality.
Tips for Successful Vectorization
To successfully vectorize an image in Illustrator, start with a clear, high-quality image. Use the image trace tool and try different presets to see which works best. After tracing, expand the image to turn it into vector shapes, clean up the vector by removing extra points, and simplify the path. Use the pen tools to refine any details and adjust the colors with the shape-builder tool. Save your work as an AI file and export it as an SVG or EPS for scability.
Keyword Short Cut for Quick Vectorization
To quickly vectorize an image in Illustrator, use these keyboard shortcuts:
1. Place the Image: Press Ctrl + Shift + P (Windows) or Cmd + Shift + P (Mac) to open the Place dialog and import your image.
2. Open Image Trace: Press Shift + Ctrl + F10 (Windows) or Shift + Cmd + F10 (Mac) to open the Image Trace panel.
3. Trace the Image: In the Image Trace panel, you can choose a preset and adjust settings. Click the Trace button to apply the trace.
4. Expand the Trace: Press Shift + Ctrl + E (Windows) or Shift + Cmd + E (Mac) to expand the traced image into vector paths.
These shortcuts help streamline the vectorization process.
Conclusion
Vectorize an image in Illustrator transforms raster images into scalable vector graphics. By using Image Trace and adjusting settings, you can convert detailed photos or simple graphics into editable vector paths. Expanding the trace and ungrouping paths allow for precise edits, ensuring high-quality and versatile designs. Get online courses on Skillshare.com.

